
Tutorial
This short tutorial shows how to create a casing with specific characteristics, add a desired trajectory and load cases to be analyzed.
The first thing to do is importing the packages well_profile for creating/loading the wellbore trajectory, and pwploads of course.
>>> import pwploads
>>> import well_profile as wp
The class pwploads.Casing() is used to create a casing object. It has three positional arguments as follows:
pwploads.Casing(outer diameter [in], inner diameter [in], length [m])
And also some keyword arguments:
pwploads.Casing(**pos_args, nominal_weight, yield_s, df_burst, df_collapse, df_tension, df_compression, df_vme)
>>> casing = pwploads.Casing(8, 7.2, 1500, nominal_weight=100, yield_s=80000, df_burst=1.1,
>>>                          df_collapse=1.1, df_tension=1.3, df_compression=1.3, df_vme=1.25,
>>>                          df_conn_compression=1.0, df_conn_tension=1.0)
Now it is time to create or load a trajectory using well_profile.
>>> trajectory = wp.get(2000, profile='J', build_angle=20, kop=1500, eob=2500)
>>> casing.add_trajectory(trajectory)
Then just add the load cases you want to include.
>>> casing.overpull(tvd_fluid=[500], rho_fluid=[1.2, 1.5], v_avg=0.3, e=29e6, fric=0.24, a=1.5, f_ov=0)
>>> casing.running(tvd_fluid=[500], rho_fluid=[1.2, 1.5], v_avg=0.3, e=29e6, fric=0.24, a=1.5)
>>> casing.green_cement(tvd_fluid_int=[500], rho_fluid_int=[1.2, 1.5], rho_cement=1.8, p_test=4472.65, f_pre=0)
>>> casing.cementing(rho_cement=1.8, rho_fluid=1.3, e=29e6, f_pre=0)
>>> casing.displacement_gas(p_res=5800, tvd_res=2000, rho_gas=0.5, rho_mud=1.2, e=29e6)
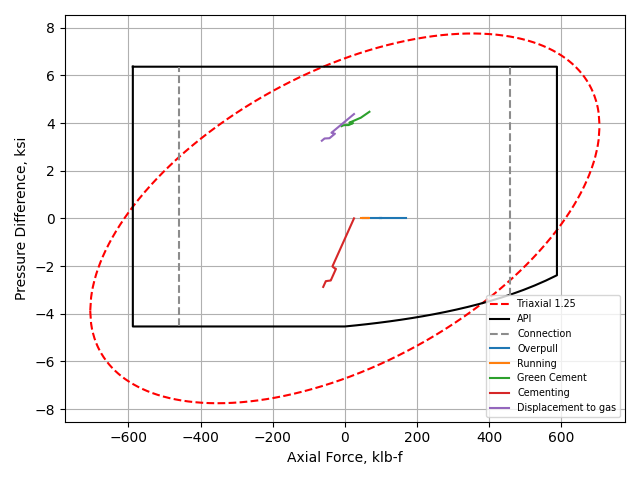
Finally, generate a plot using pyplot from matplotlib. Notice that plotly is also an option (and it is used by default)
>>> casing.plot(plot_type='pyplot').show()
Web Application
There is also the web-app based on pwploads: